

Playing Well with Others While Predicting Spam Messages
As a former DataRobot customer (now an employee), one of the key aspects of the platform is its ability to integrate with numerous BI (business intelligence) tools. From Tableau to Power BI and Qlik to Alteryx, pick your tool and there’s a good chance you can integrate it with DataRobot. The key lies in the API. One of the most challenging aspects of any data process is the movement of data between platforms. I come from the healthcare industry and the problem was ever-present my world.
This blog is going to focus on the end-to-end integration of the DataRobot API and use Microsoft’s “Power” tools: Power BI, PowerApps, and Microsoft Flow. Let’s assume that I’m in a hurry and I want to take the quickest path to actionable insights. Simply put, I want to:
- Use PowerApps to create a mobile app that consumes user data.
- Send text data to DataRobot for prediction scoring via Flow.
- Visualize the results in Power BI.
The data for this example is incredibly trivial. It is the SMS spam dataset. The problem we are trying to solve is determining if a message is “spam” or “ham”, the latter being a message we actually want to read.
Here’s a sample of both from the raw data:
Spam := “Play the official Ultimate Spider-man game for $4.99 on iOS or Android. Text SPIDER to 83338 for the game & we’ll send u a FREE Venom wallpaper”
Ham := “Hope you are having a good week. Just checking in.”
First, I take my raw data set and use the drag and drop feature in DataRobot to kick off the automated machine learning process. I let DataRobot run in Autopilot (seriously, that’s what it’s called). After a quick exploratory data analysis (EDA) process, I chose a target. In this case, the column named “type” in my dataset contains the spam and ham label. DataRobot chooses around 60 models to run based on the outcome of the second EDA process. The models run automatically and appear on a Leaderboard and DataRobot labels the best model to deploy for me.
In this case, the top model is a Python-based “Nystroem Kernel SVM Classifier”:

Figure 1: DataRobot’s Leaderboard with a green arrow pointing to the winning model and a yellow arrow showing the deploy button.
Now that I have the best model ready, I can navigate over to the Predict tab within the model itself and choose the Deploy Model API option. From there, deploying the model is a simple button click and our best model is moved to a dedicated prediction server. I just need to grab the Deployment ID and API key as shown in Figure 2. That’s it on the DataRobot side!

Figure 2: A deployed model showing the Python code needed to call the prediction API. The green arrow points to the Deployment ID and the orange arrow points to the DataRobot key (blurred out). We’ll need both for the integration with Microsoft Flow.
Turning to Microsoft’s Flow application, a web-based cloud platform that can process data from a wide array of sources. Flow requires a trigger action to initiate the flow process and in this example, I want to trigger the flow from PowerApps. Once triggered, I need Flow to call the DataRobot API, then process the subsequent JSON, and kick out two variables to PowerApps, one for the prediction probability and one for the prediction label (ham or spam). Again, super easy.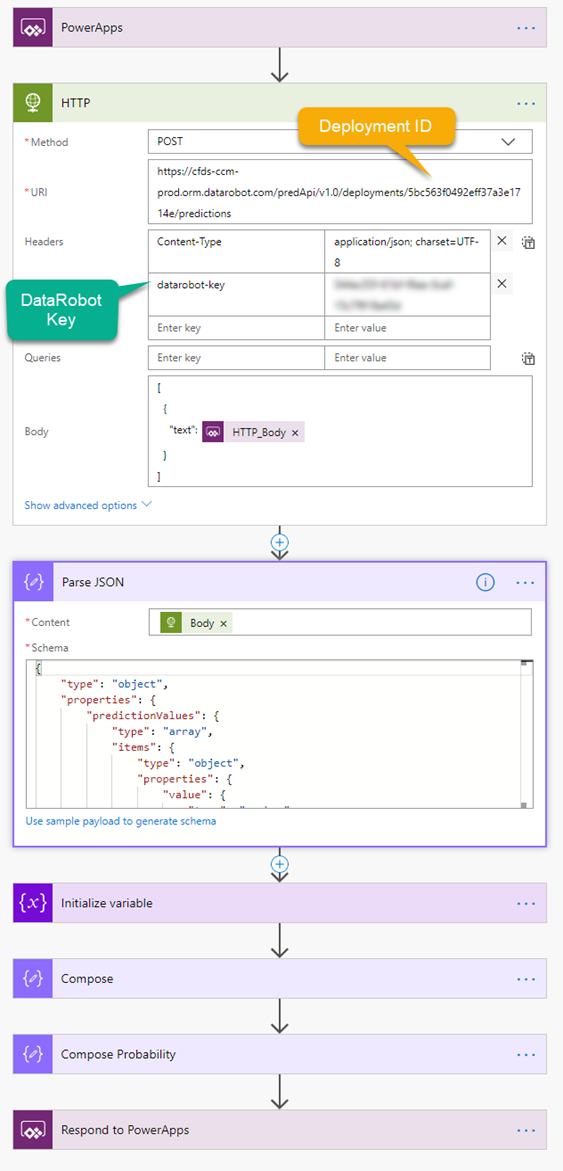
Figure 3: The complete Microsoft Flow process with the HTTP request expanded and the JSON parse expanded.
Figure 3 shows the HTTP request expanded and indicators where I’ve place the Deployment ID and Key from DataRobot needed to complete the API call. Also included in the HTTP request is the Content-Type of the request and the Body of the request, in this case, it’s the text message we’ll get from PowerApps. In response to a successful API call, I’ll receive JSON data back that will need to be parsed inside the flow. The DataRobot documentation contains a JSON sample that I can provide to the flow as a template to automatically create the JSON Schema. I just click the “Use sample payload to generate schema” link and paste in the sample JSON.
The last few steps are fairly straightforward. I need to initialize a variable to store the parsed JSON as an object variable type and assigned the Body of the Parse JSON step to this variable. After that variable is initialized, I assign the corresponding values from the previously initialized variable to two separate variables, as shown in Figure 4. The final step of the Flow is to add a “Respond to PowerApps” step and create the variable names that will be passed PowerApps. I need to create two entries, one to save the prediction probability value (a number between 0.0 and 1.0) and another for the prediction label (ham or spam). The Output from each of the variables is added to the names created in this last step.

Figure 4: The variable and PowerApps response steps expanded to show detail.
Next, I need to build a mobile application in Microsoft PowerApps. I already mentioned I’m short on time, so I need to pump this app out in a hurry. We are going totally minimalist in design with a simple DataRobot logo, a label, a text input, a button, and two objects to store the variables coming from Flow. Most of the work in PowerApps is drag and drop. I do have to write a tiny bit of code in the form of function calls for the Set and Results operation.
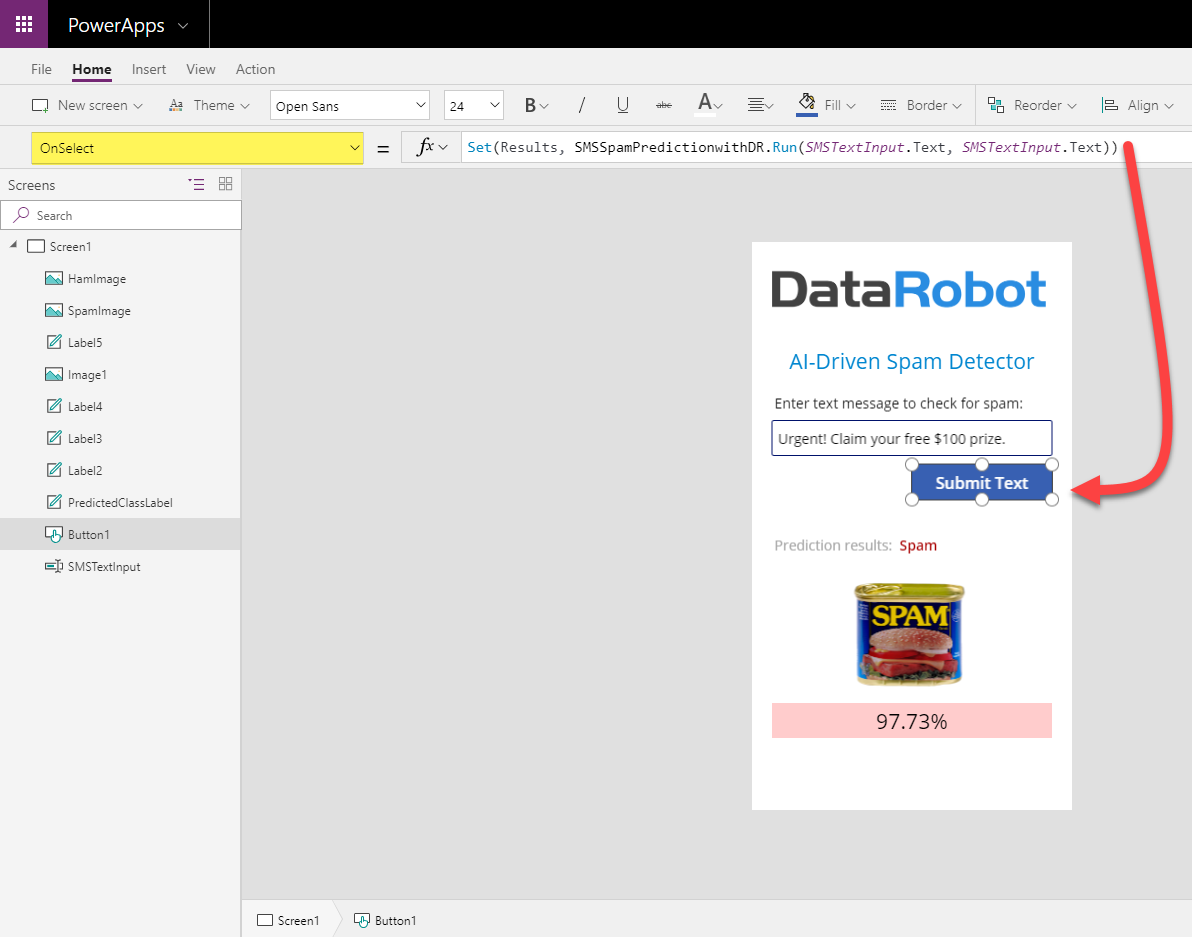
Figure 5: Use the Set function to assign the output from Flow to the Results variable in PowerApps
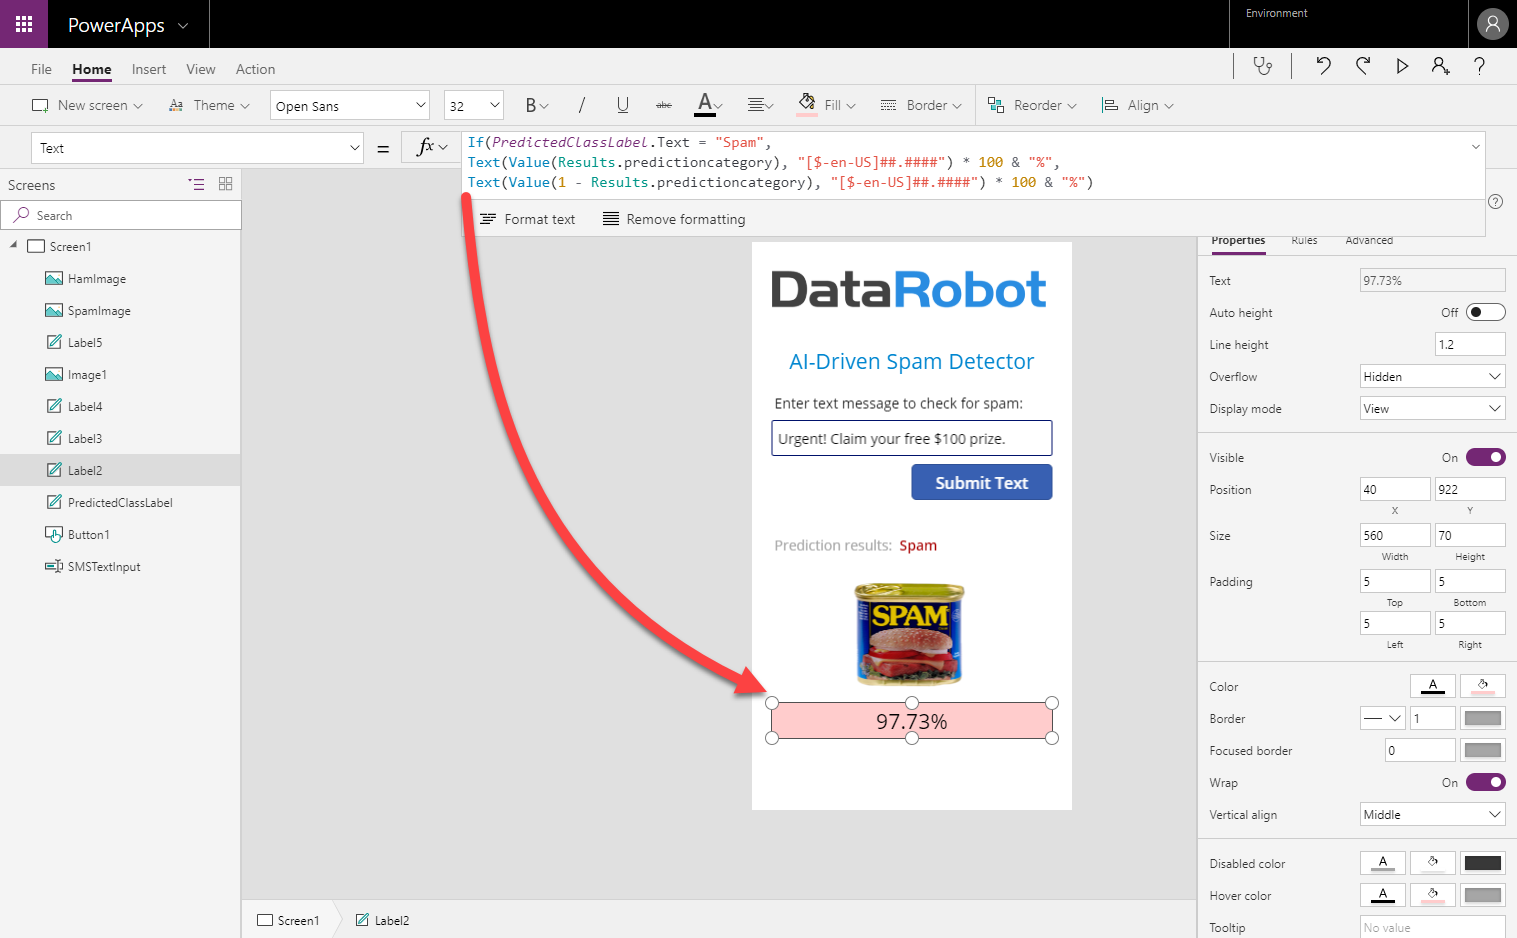
Figure 6: The Results variable to be used in an If statement to format the percentage for display

Figure 7: The final version of our Spam detector Power App.
At last, I can build out my visualization, again, very trivial but proves the end-to-end scenario. Every record that I score in DataRobot is simultaneously being written to a a dataset in the Power BI Service. What makes this solution so glorious is that I don’t have to worry about setting up or managing a SQL database right now. Of course, if I’m looking for a more robust solution then I can easily change the Flow to write records to SQL instead. The design changes slightly, I just connect Power BI to the SQL database.
Back to the Flow, all I do now is create a parallel branch that will ‘Add rows to a dataset’. I need to tell Flow which Workspace to use, the Dataset name within the Workspace, and the Table within the Dataset. I’m going to send Power BI the original Message field that was typed into PowerApps and Type (spam or ham) that was returned from DataRobot along with the numeric Probability field. I had to format the Probability field in Flow so it would display as a percentage in Power BI, that’s why the example in Figure 8 is an expression.

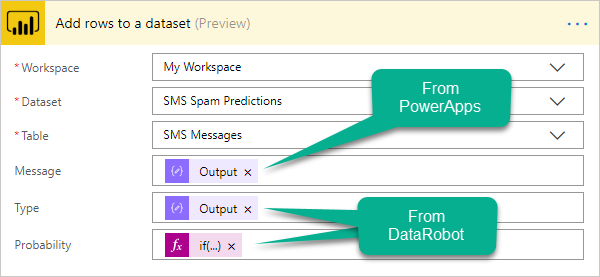
Figure 8: Adding a parallel branch to the original Flow and the configuration of the ‘Add rows to a dataset’ Power BI action.
Using Power BI I can query that data, which is now stored in the Power BI Service, and display a few basic visualizations like a table and a vertical bar chart with a simple count of predictions for each outcome:
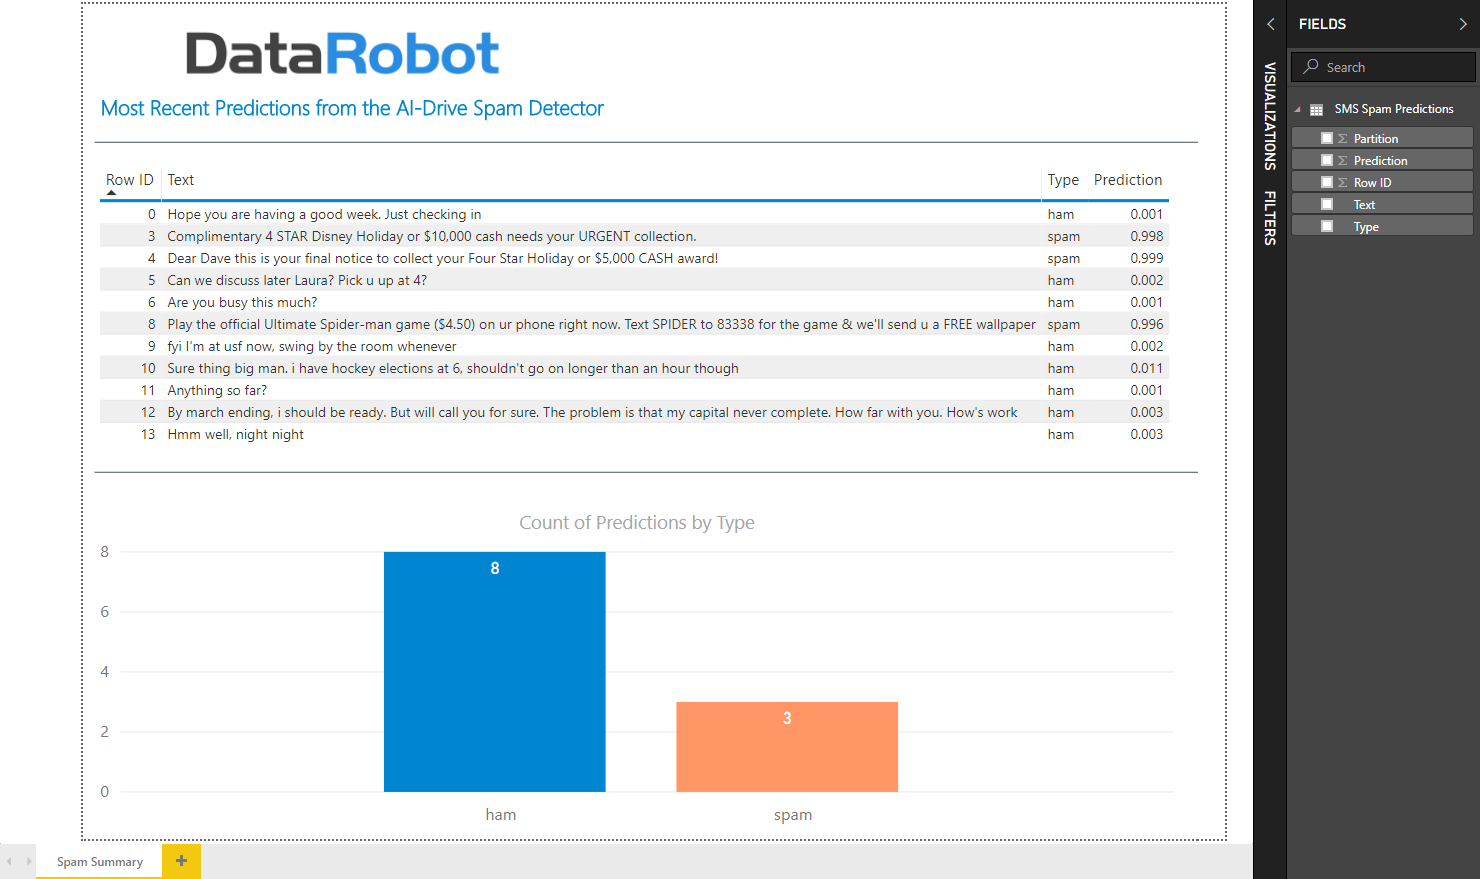
Figure 9: A very basic Power BI visual showing the most recent predictions sent through the PowerApp.
This example took me a grand total of about 3 hours to create. Without these tools, I estimate it would take several weeks to a few months depending on the data scientists and programmers involved in the project. I spent a lot of time in Flow, learning the app and its quirks. One of the key learning moments for me in Flow was to rename to action titles right away. When I changed the action titles after creating a new action, Flow would throw an error stating that it couldn’t find the referenced action. I used to name changes being automatically updated, like they are in PowerApps, across the application. If I did the process over again, I could reduce the total time to an hour and a half, maybe even a little less. Impressive, most impressive.

Looking down the road at future work, there was an announcement at the Summit about the addition of Dataflows (separate from Flows mentioned here, confusing right?) in the Power BI Service. Based on initial impressions, Dataflows can be used in Power BI as a data source combined with the ability to perform a modest amount of data prep. Ideally, I’d like to see the new Dataflows feature embed some of the Flows process documented here. That would be a powerful combination (sorry for the pun). Alright, now it’s your turn, with Microsoft’s Power Platform combined with DataRobot, you’ve got the Power!

I presented this process in detail along with a brief intro to automated machine learning with DataRobot at the Microsoft PASS Summit in Seattle on Friday, November 9th. If you were an attendee, you should have access to the slides posted online at the Summit site.

About the Author
Nathan Patrick Taylor is currently serving as a Customer Facing Data Scientist at DataRobot. Prior to joining DataRobot, Nathan was the Director of Data Science and Analytics at Symphony Post-Acute Network. He has experience using Microsoft Power BI, PowerApps, and Flow since their inception, and has also integrated DataRobot with Tableau, Qlik, Alteryx, and SnowflakeDB (all DR partners). Nathan completed his Bachelor of Science in Computer Science at Huntington University and is currently working on his Ph.D. in Health Science at Northern Illinois University. As for personal interests, when Nathan is not behind the keyboard, you can find him stalking the tennis courts or watching Federer and Nadal on TV.

Prior to joining DataRobot, Nathan was the Director of Data Science and Analytics at Symphony Post-Acute Network. He has experience using Microsoft Power BI, PowerApps, and Flow since their inception, and has also integrated DataRobot with Tableau, Qlik, Alteryx, and SnowflakeDB (all DR partners). Nathan completed his Bachelor of Science in Computer Science at Huntington University and is currently working on his Ph.D. in Health Science at Northern Illinois University. As for personal interests, when Nathan is not behind the keyboard, you can find him stalking the tennis courts or watching Federer and Nadal on TV.
-
How to Choose the Right LLM for Your Use Case
April 18, 2024· 7 min read -
Belong @ DataRobot: Celebrating 2024 Women’s History Month with DataRobot AI Legends
March 28, 2024· 6 min read -
Choosing the Right Vector Embedding Model for Your Generative AI Use Case
March 7, 2024· 8 min read
Latest posts
